


.jpg)

.jpg)
ELECTRICAL tombstone taillight assembly mount/frame permanent repair
Service manual required
DOCUMENT CHANGE HISTORY:
Date changed By Recap of changes
4/18/2012 gtmalone document created
10/29/2012 gtmalone add Figure 3A for socket disc position
2/20/2013 gtmalone add alternate method to remove/install tailight assy - step 2.1 alt
6/17/2014 gtmalone minor updates to text, add section 3 and Figure 8 for Kuryakyn LED taillight panel installation
KEYWORDS AND KEY PHRASES tombstone - taillight - cracked - broken
APPLICABLE YEAR/MODEL 1997-1999 Evo 2000-2003 TwinCam
1. TECHNICAL AREAS ADDRESSED
1.1 - The internal plastic mount/frame inside the tombstone taillight will crack and deteriorate with time. OEM replacements have the same design and the same problems. This piece that fails is not available separately. A new taillight assembly must be purchased. The solution here is to replace the plastic piece with a machined billet aluminum mount (aka frame) for a permanent fix.
The replacement aluminum mount/frame can be obtained from
www.automotivemachine.com
Automotive Machine & Supply
5215 Conveyor Drive
Cleburne TX 76031
817-335-9331 Ask for Eric and refer to part number AMS-GM1
2. HOW TO - REPLACEMENT OF TOMBSTONE TAILLIGHT INTERNAL FRAME
Disconnect the NEGATIVE battery cable before continuing.
Follow your service manual or methods you have used before for most of these steps.
NOTE - The figures presented were taken with the prototype piece. Production pieces appear slightly different; reflecting a few improvements.
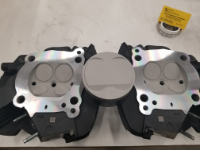
See Figures 6 and 7 for comparison of the OEM and replacement pieces.
(link to figures referenced in these instructions, tech tip https://www.smugmug.com/gallery/n-Tmhnsj and more pics at https://www.smugmug.com/gallery/n-3pBSfZ/
2.1 - Remove the rear wheel if needed for access to the three nuts holding the taillight to the fender and the taillight wiring.
2.1 alt - Remove the ECM and it's plastic mount from the bike. There is a plastic button at the top of the mount and two bolts behind the fuse box. You may be able to reach through the opening in the fender to access the taillight wiring clips. You may be able to reach the three nuts holding the taillight to the fender by reaching under the fender from the rear.
2.2 - Disconnect the taillight/turn connector under the seat.
2.4 - Extract the three pins from the male half (fender side) of the connector for the taillight (blue, red/yellow, black). Make note of which wires are in which positions in the connector.
2.5 - Pull the wire bundle for the taillight out of the clips on the underside of the fender. Push the grommet and wire bundle through the hole in the fender. The plastic clips may come off of their mounting buttons.
2.6 - Remove the taillight assembly from the fender.
2.7 - Remove the taillight housing/lenses from the taillight assembly.
2.8 - Remove the two bulbs from their sockets.
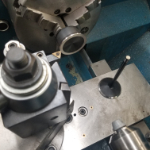
2.9 - Drill out the rivet holding the two sockets to the plastic frame and remove the sockets from the frame. Be careful not to damage the ground wire terminal. See Figure 1 and 2.
2.10 - Install the two sockets and the ground wire terminal onto the replacement aluminum mount using a 10-24 x 1/4” pan head machine screw. Use red loctite on the screw threads. See Figure 3. Ensure the terminal disc inside the socket is positioned with the tab in the socket slot. Use a pair pliers to lightly squeeze the socket to better grip the disc and the bulb base. See Figure 3A.
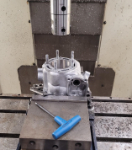
2.11 – Place the replacement aluminum mount assembly onto the fender. Tighten the three mounting nuts finger tight. Install the taillight bulb and license bulb. Route the wiring bundle as shown in the figures. Push the wire bundle and grommet through the hole in the fender. See Figure 4 and 5.
2.12 - Place the taillight wiring bundle into the clips on the underside of the fender.
2.13 - Reinsert the three pins into the proper positions in the taillight/turn connector. Reconnect the connector. Check that the tail, brake, and turn signals operate properly.
2.14 - Install the taillight gasket and housing/lenses onto the aluminum mount assembly. Use antiseize on the three housing screws. Reinstall the license plate mounts/brackets at this time as needed.
NOTE - Due to manufacturing variations with the taillight housing, taillight lens, and the replacement piece, you may have to use a 3/16” drill bit to drill out the three housing and lens holes to achieve alignment.
2.15 - Adjust the position of the taillight assembly as needed. Tighten all bolts and nuts.
2.16 - Reinstall the rear wheel or the ECM/mount depending on your removal method. Recheck taillight, brake light, and license lamp functions.
ALL DONE!
3. INSTALLING KURYAKYN LED TAILLIGHT PANEL (part no. 5410)
Note: These steps are specific to the replacement billet aluminum taillight mount/frame. For a stock taillight follow the Kuryakyn instructions only.
The replacement taillight mount/frame is slightly thicker than the stock plastic mount/frame which may cause the tail lamp socket to interfere with the installation of the Kuryakyn LED taillight panel. The solution is to flip the socket upside down to gain clearance.
3.1 - Remove the taillight housing and lens from the taillight assembly. Remove the three allen socket head cap screws on the face of the taillight and one nut at the top backside of the license plate mount. This may vary depending on your license plate mounting.
3.2 - Remove the one screw holding the tail lamp socket and license socket to the aluminum mount/frame. Position the sockets and wiring out of the way. Next
remove the three nuts holding the taillight internal frame to the fender. You may be able to reach the three nuts holding the taillight to the fender by reaching under the fender from the rear. Remove the rear wheel if needed.
3.3 - Refering to Figure 8, position the tail lamp socket upside down as shown. Mark and drill a new hole to receive a screw to hold the socket in place. We suggest drilling a #29 hole (0.136”) and tap 8-32 threads; or drill a #25 hole (0.1495”) and tap 10-24 threads). The license plate lamp socket and ground wire lug can remain in their original positions.
3.4 - Use a Dremel or grinding tool to cut a notch for the wire bundle as show in Figure 8.
3.5 - Loosely mount the aluminum taillight mount/frame onto the rear fender.
3.6 - Install the tail lamp socket and license plate lamp socket to the aluminum mount/frame.
3.7 - Plug the LED panel into the tail lamp socket.
3.8 - Test fit the taillight parts and LED panel. Be sure the wiring is not pinched in the taillight housing or aluminum mount/frame. The taillight housing should seat squarely onto the gasket and fender. Make adjustments as needed.
3.9 - Test the taillight and brake light functions with the new LED panel. Check that the license lamp is working.
3.10 - Reassemble the taillight and tighten all nuts and bolts. Use anti-seize on the three allen socket head cap screws on the face of the taillight.
NOTE - Due to manufacturing variations with the taillight housing, taillight lens, and the replacement piece, you may have to use a 3/16” drill bit to drill out the three housing and lens holes to achieve alignment.
3.11 - Recheck taillight, brake light, and license lamp functions.
ALL DONE!
Links to figures / photos referenced in tech tip https://www.smugmug.com/gallery/n-Tmhnsj and https://www.smugmug.com/gallery/n-3pBSfZ/
Credits: Install Instructions were independetly written and submitted by Gordon Malone, after he bravely agreed to be our 1st beta tester in 2012, and installed an AMS-GM1 mount on his beautiful Harley Springer. Thank you Gordon, for all your help and feedback!